


Supplies Needed to Complete This Task
You will need one of your cut-to-size cushions, fiberfill, a tape measure, straight edge, stapler and scissors.
Calculating Fiberfill Size
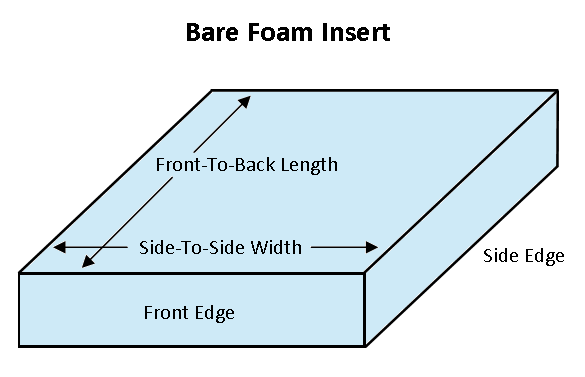
To calculate the dimensions you will need for your fiberfill wrap, follow the formula below, taking the measurements from your bare foam insert.
Formula - Staple Method |
Example #1 - (24"x24"x4") (24" Side-To Side) x (24" Front-To-Back) x (4" Thickness) |
Example #2 - (30"x24"x6") (30" Side-To Side) x (24" Front-To-Back) x (6" Thickness) |
To Find Fiberfill Sheet Width: (Foam Cushion Side-To-Side Width) + (Foam Cushion Thickness) + (2") |
(24") + (4") + (2") = 30" |
(30") + (6") + (2") = 38" |
To Find Fiberfill Sheet Length: ((Foam Cushion Front-To-Back Length + Foam Cushion Thickness) x2) + (2") |
((24" + 4") x2)=(56") + (2") = 58" |
((24" + 6") x2)=( 60") + (2") = 62" |
Required Fiberfill Dimensions
|
30"x58" |
38"x62" |
Cutting the Fiberfill Needed for Your Foam
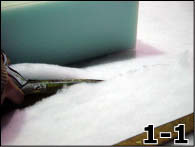
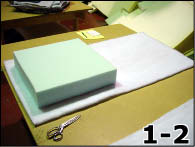
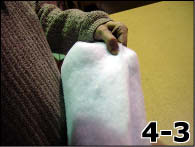
After calculating the size of your fiberfill covering, measure and cut the material, as shown in picture 1-1. The straight edge may be helpful as a guide to make straight cuts. Once the polyester fiberfill is cut to size, fold the material over the cushion and center the foam in the fabric so there is even fabric overhang on the sides and back, shown in pictures 1-2 and 1-3. The front of the cushion should be covered by the smooth center of the fiberfill sheet and the back edge should be open.

Stapling the Back of the Cushion
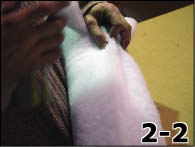
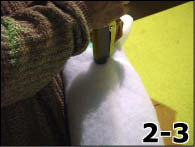
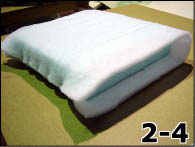
Begin securing the fiberfill at the back edge of the cushion. The easiest way to hold the cushion in place during this process is to pin it between your body and the edge of the table. The front edge of the cushion should be facing the ground and the back edge with loose fiberfill should be facing you. With the cushion held in place, begin by gently pulling up on the outer fiberfill lip then folding it down toward you, as seen in picture 2-1. Then, gently pull up on the fiberfill overhang closer to your body and fold it down over the other, as seen in picture 2-2. Pinch the two sections of fiberfill together and staple them in the middle of the edge as seen in picture 2-3. Staple the fiberfill together every 2 to 3 inches along the back of the cushion. Leave the outer edges of the fiberfill unstapled about 2" into the form however, as shown in picture 2-4. These loose edges will be used to finish the sides of the cushion.

Stapling the Cushion's Sides - Part One
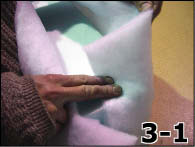
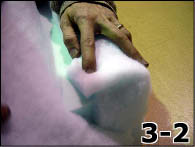
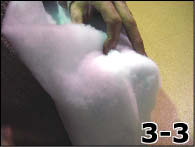
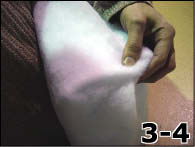
Rotate the cushion so one side edge is facing you. Starting from the backside of the cushion,which you just stapled, begin by folding the excess fiberfill down from the corner of the cushion as shown in picture 3-1, gently stretching the fiberfill as you make the fold. Fold the top lip of fiberfill over itself like wrapping a gift, shown in picture 3-2. Holding that fold in place, repeat the steps for the bottom lip as shown in pictures 3-3 and 3-4. Secure the corner in place with two or three staples. Only place staples a couple inches in from the back edge however, as you will finish the sides from the front to complete the cushion later. Repeat the back corner-covering steps from the other side so that both end up matching picture 3-5. You will now have the entire back edge and the back corners of each side secured.

Stapling the Cushion's Sides - Part Two
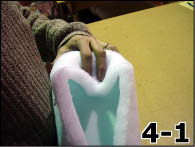
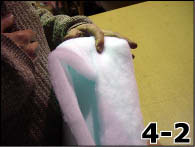
Moving to the front edge of the cushion, you will fold and staple those corners. Fold down the center of the front edge's fiberfill against the foam as shown in picture 4-1, remembering to stretch gently as you fold. Fold the top lip down like picture 4-2 and then the lower lip over it, as in picture 4-3. Make sure the lip you fold down first is the same one at the bottom of the fold on the back, so the wrap doesn't meet in a twist at the center. Put two or three staples in the fiberfill to hold the edge folds in place. Repeat this process on the other side.
Stapling the Cushion's Sides - Part Three
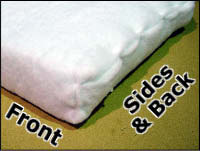 The only unstapled section of the cushion at this point should be the center of each side. Instead of finishing from one end, pick a side and begin at the cushion's center. Fold down the side of overhanging fiberfill that's at the bottom of your two corner folds, gently pull the top section over it and staple. Having secure points at three locations along the cushion's side will make it much easier to keep the fiberfill even. Working from one end to the other can result in a crooked seam as you go along. From the center, work in either direction using the same method, adding a staple every 2 to 3 inches. Repeat this process on the other side, and you will end up with a fully wrapped cushion that looks like the one shown to the right.
Smooth the Sides (Optional)
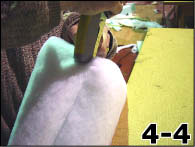
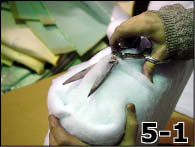 With heavier covering fabrics this step may be unnecessary, but you may choose to clean up the cushion before putting it in its case. Trim off any fiberfill that extends beyond the edge of the cushion, as shown in picture 5-1. Take caution to not trim too closely to the staples because they may lose their hold without enough fabric.
Previous: How to Cut the Foam for Your Cushion
Next: How to Stuff Your Cushion